
To recap, the bulk-email management system provides a means of managing subscribers (recipients of our emails), newsletters (emails that will be sent to the subscribers) and requests (unit of work for sending out the email to a group of subscribers). A request is an instance of a RequestHeader object which when created calls a method that analyses the object, creates instances of a RequestDetail object for each message/recipient, sends each to an Azure Message Queue where a Queue Trigger attached to that queue calls an EmailService to despatch each to the subscriber.

Like I mentioned in the concluding bit of my last post, an Azure Queue Trigger Function is fine for use cases where your overhead processes are unlikely to be lengthy leading to a time out. It’s also relatively cheaper if you use the consumption plan Azure subscription where you only pay for what you use.
On the other hand, if you’re going to be running lengthy or even continuous processes in the background, for example, continuously sending out emails frequently to tens of thousands at once, it helps to use an Azure WebJob.
What is an Azure Web Job?
Azure WebJobs allow you to write background code that run in the context of a Web App. That ‘Web App’ context is the notable difference between a WebJob and an Azure Function.
Think of the Web App as a Website which means you pay for hosting costs. Even if you do not have a Web App, when deploying a WebJob, you’ll be required to set up an App Service which will be tied to the WebJob. That extra layer adds some cost and determines certain features that can be enabled for the WebJob in Azure. Hosting on Azure is relatively expensive compared to other shared hosting platforms. For example, the client-facing project for this system – BabaFunkeEmailManager.Client – included in the GitHub repo costs me less than a $100/year to host on AspHostPortal. I couldn’t say the same for the Azure Resource for my WebJob where the cost seems to increase everyday it stays up. Hence, a WebJob will quickly get pricey the longer it stays up even if you use it sparingly.
As earlier stated, I’m adding this WebJob project as an alternative to the use of the RequestTrigger.cs Queue Trigger function in the BabaFunkeEmailManager.Functions project.
A WebJob is the foundational implementation for Azure Functions. In other words, Azure Functions were built on WebJobs. So, don’t be surprised by the similarity between both. In fact, you’ll notice the use of similar SDKs used by Azure Functions.
Create a Standalone WebJob in Visual Studio
Note that this is completely independent of the BabaFunkeEmailManager.Functions API project we created earlier in Part IV. While the API project provides the underlying endpoints on which we can manage subscribers and requests, this WebJob project is being created independently without any dependence on the former. The reason for this is that my WebJob only listens for any addition to an Azure Queue Storage. How we chose to add that message to the queue is up to us. Recall that for this project, that process of adding messages to the Queue is handled in the API project.
To Create and deploy a standalone WebJob in Visual Studio, do the following:
Step 1 – Create a new project and select the Console App (.Net Core) C# template
Step 2 – Install the following Nuget Packages
- Microsoft.Azure.WebJobs
- Microsoft.Azure.WebJobs.Core
- Microsoft.Azure.WebJobs.Extensions – With this, we can tap into popular triggers and output binders associated with Azure functions. If you intend to use the Table Storage output binder like I did in my project, you may need to downgrade to version 4.0.
- Microsoft.Azure.Webjobs.Extensions.CosmosDB – For Table Storage access
- Microsoft.Azure.Webjobs.Extensions.Storage – For Queue Storage access
- Microsoft.Extensions.Logging and Microsoft.Extensions.Logging.Console – For logging messages
- SendGrid – Email sending is done via its API. Recall this project is to be deployed independent of the BabaFunkeEmailManager.Functions project so it needs its own settings.
- FluentEmail.SendGrid
Step 3 – Add Project reference to BabaFunkeEmailManager.Service project as we’ll be relying on its EmailService. Also, add BabaFunkeEmailManager.Data as a project reference as we’ll be relying on it also.
Step 4 – Configure the Program.cs file as follows. What we’re simply doing is building a new Host, configuring its builder for WebJobs and adding required services including our own custom EmailService. Lastly, we run the host.
Step 5 – Create the function to process the queue. Taking advantage of the Nuget Packages we added earlier, we can easily add attribute binders like a QueueTrigger and Table Storage as seen below. All our code is doing is listening for when a message is added to a Queue called ‘requests’. Once that happens, it simply deserializes the message into an instance of a RequestDetail object, calls the EmailService to send out the email then adds the response to a Table Storage called ‘EmailReport’. That’s it!
Add an appsettings.json file as below.
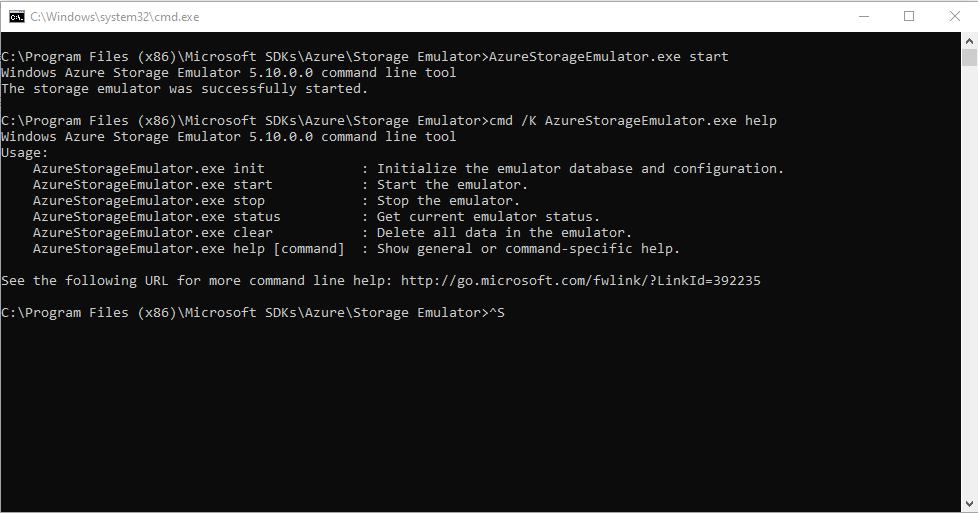
Local Testing using the Azure Storage Emulator
The easiest way to test the WebJob locally is to install and run the Microsoft Azure Storage Emulator. You should get a screen like below once it’s up and running.
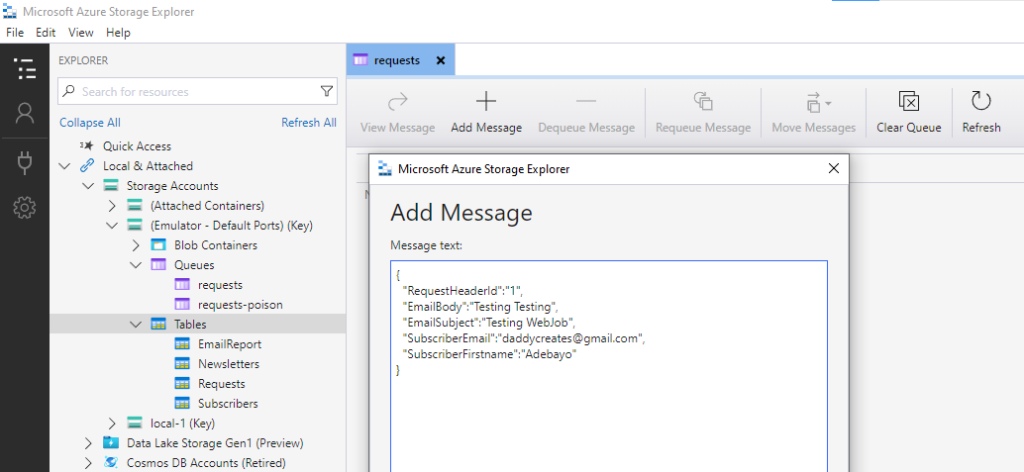
Then run Azure Storage Explorer. Create a Queue called ‘requests’ under the Emulator section for Queues as seen below. You should also go ahead and create the ‘EmailReport’ table under Tables as seen below.

In Visual Studio, set the WebJobs project as you Startup project (if you have multiple projects in one solution like I do) then run it.
In Azure Storage Explorer, double-click the ‘requests’ Queue you created earlier and select ‘Add Message’ at the top. Then Add a JSON payload that mirrors a RequestDetail object as shown below
{
  "RequestHeaderId":"1",
  "EmailBody":"Testing Testing",
  "EmailSubject":"Testing WebJob",
  "SubscriberEmail":"[email protected]",
  "SubscriberFirstname":"Adebayo"
}
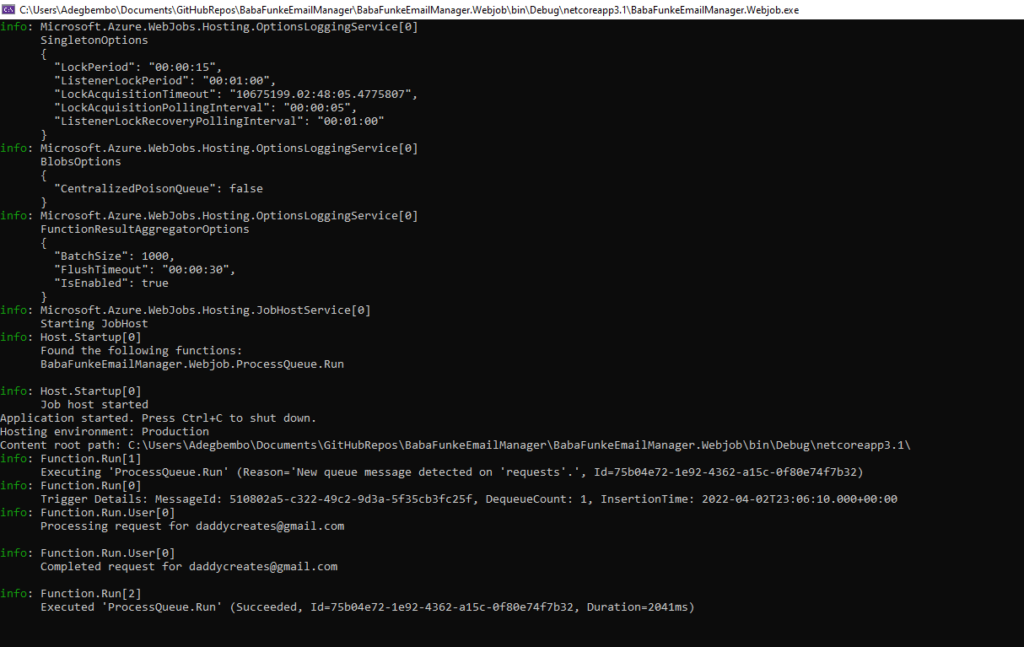
You should see the ProcessQueue function run with the logged messages appearing before and after the process completes as seen below.
Deploying to Azure Portal from Visual Studio
I use Visual Studio 2022.
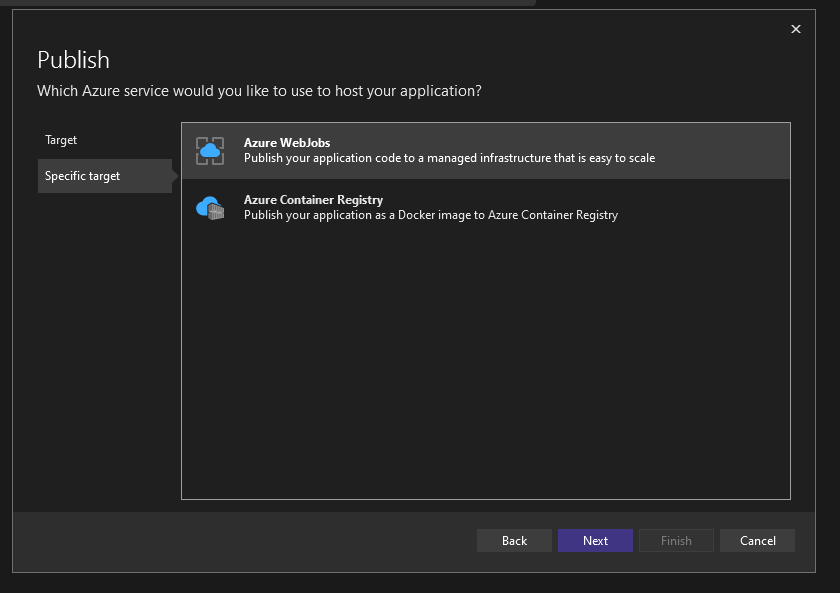
Right-click the WebJob project and select Publish. From the list of options in the Publish panel, select Azure then Next. You should see the screen below. Visual Studio is smart enough to know that this Console Application is a WebJob, hence the option it provides you with. Select the ‘Azure WebJobs’ option.
Recall that a WebJob needs to be associated with a web app so you’d have to create one if you don’t already have one to associate with in your existing Azure Portal. Follow the steps on-screen to create one. Take special note of the Hosting Plan as your choice determines how much you’re likely to incur in hosting. Also, set the Azure Webjob type to Continuous instead of Triggered.
Once it’s up and running, navigate to the AppService in Azure Portal and add the necessary configuration. In this case, the values for the keys in your local appsettings.json file should be replaced with the live storage account values.
Also, if you’re on a paid subscription plan, enable the ‘Always on’ setting in the configuration page. This ensures your WebJob never times out due to inactivity.
Considerations
Some issues to consider based on my experience are as follows:
- When deploying from Visual Studio, you may encounter a problem with an error that says …published failed due to unable to copy files…. The fix is to reduce the length of the WebJob name. In my case, BabaFunkeEmailManager.WebJob was too long a name for it so I shortened it. You can do that in the Publish dialog settings by clicking the edit button for the WebJob name. Reference: https://github.com/dotnet/sdk/issues/14994
- Even though ‘Triggered’ seems more probable for our use-case, I realised I always had to manually kick-start the WebJob by calling its WebHook from PostMan which isn’t ideal. Using the Continuous option solved that issue.
- Recall that with the WebJob in Azure, you have an associated AppService Hosting Plan which can be relatively expensive depending on your use case. If you’re not going to be running lengthy processes continuously, I’d ditch this for a simple Azure Functions Trigger as demonstrated in Part IV of this post series.
Conclusion
That’s it! If you’ve been receiving my emails then this is the custom system I’ve been using. To use same, simply clone the project in GitHub and you should be up an running with a few tweaks to use your own details. Happy to help if you run into any issues.