Faced with the task of having to manually send out emails to new customers when they successfully pay for an affiliate product via Stripe, I decided on using a Webhook to automate the process, thereby gaining more family time. A mock of the project can be found in my Github repo.
The product in question is a landing page for an Igbo language-learning tutoring service where customers pay for either a private or group lessons via Stripe. The customer-onboarding process is relatively simple as illustrated below.
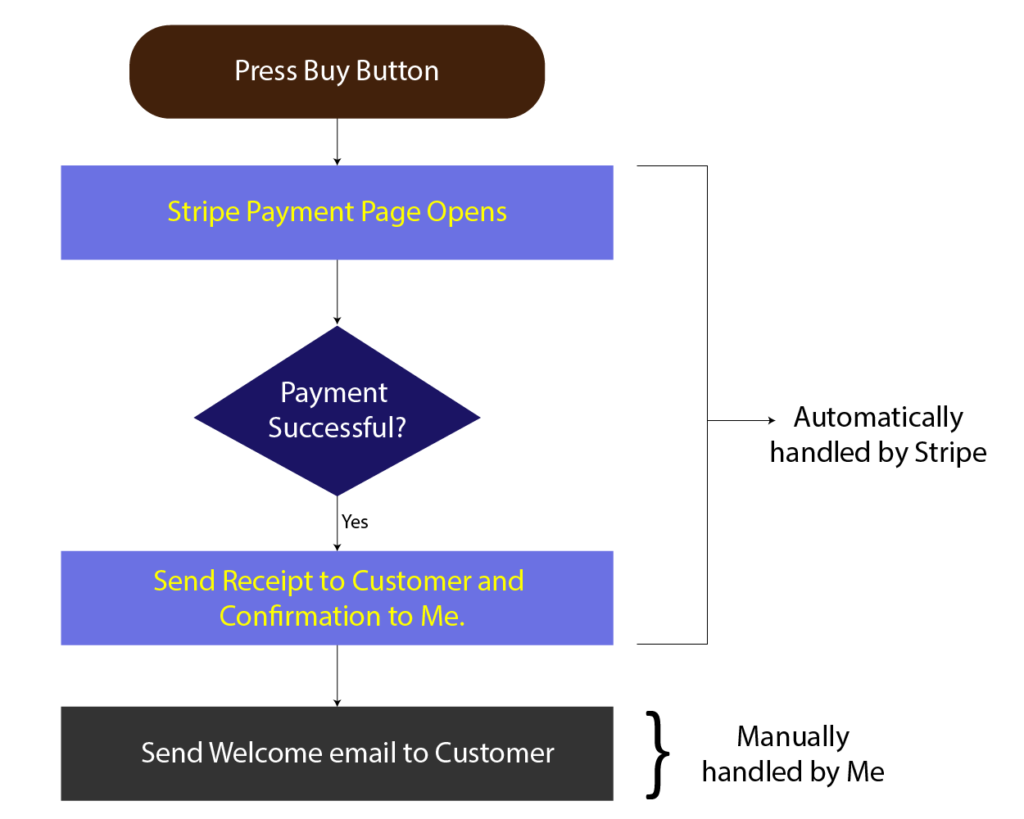
Payment integration is a tricky one to implement without relying on accredited vendors like Stripe given the issues of security and regulations. Stripe, a reliable payment integration platform does the heavy-lifting including providing a secure payment page, security checks behind the scenes, sending of receipts and confirmation emails. However, one manual intervention on our part is, we still needed to copy and paste a standard email to the customer as follows:
Ndewo,
Once again, thanks for ordering our online class with Aunty Chi! This form is to help us better prepare for an exciting journey with you by identifying your preferred time slot among others.See link below: ******
Ka o di!
With customers drawn from different parts of the world, varying time differences not to mention my daddy-duties, manually sending out these emails suffer from delays. Ideally, we want a customer to get the email as soon as his/her payment on the website successfully goes through. Hence, my problem statement:
Wouldn’t it be great time-saver if I could have an email automatically sent out for every customer whose payment is successful?
Enter Webhooks
A webhook is simply a URL that is called when an event happens. This URL is provided by one application (mine) to another service (Stripe) such that the latter calls the URL whenever a defined event occurs. Stripe already defines certain event triggers such as when a payment is successfully made on my account and it shares the details of the successful payment as variables (customer email, amount etc.) which are passed on to my URL. The URL in turn points to an action or logic that the application wants to happen in response. This ensures an automated application to application communication without any manual intervention.
Solution
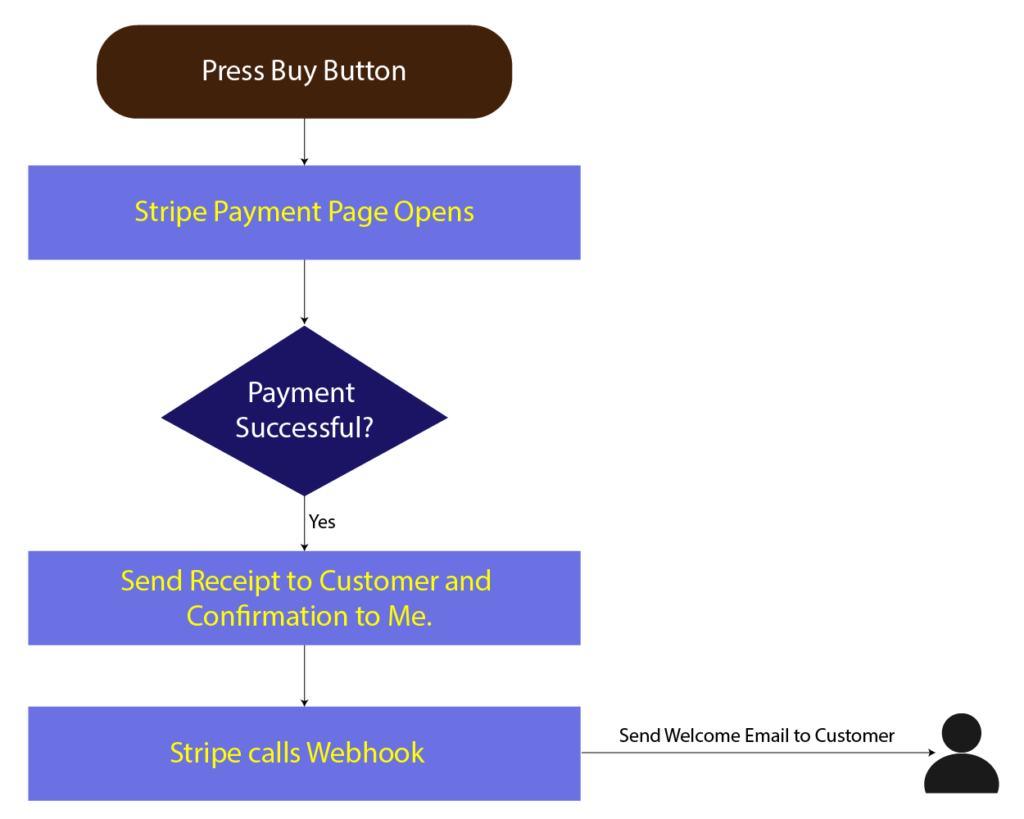
In my case, I simply added a new Api endpoint to my existing web application. The single endpoint gets called by Stripe only when a payment succeeds. Stripe keeps track of every payment attempt as events but I’m more interested in when a payment successfully goes through. With that, my process flow now looks like the illustration below
How?
Here’s a walkthrough of my implementation using a mock project which is available on Github.
Step 1 – Scaffold an Asp.Net Core Web Api project
Create an Asp.Net Core Web Api application. I use Visual Studio’s Web Api template which scaffolds a generic project complete with a ready-to-use endpoint.
Step 2 – Install required NuGet Packages
Given I use Stripe for my payment integration, I install Stripe’s official NuGet package. Stripe is very well documented and quite easy to integrate.
My process flow involves automatically sending out emails to customers, hence I also install the FluentEmail.SendGrid and SendGrid NuGet Packages.
FluentEmail is a simple email-sending Api that relies on services like SendGrid. SendGrid’s free package includes sending out 100 free emails/day forever. It’s also well documented but you need to register with them to get an Api key which will be used for setting up your application.
Step 3 – Create Services
I create an interface with a single method and a class implementation for sending an email.
Step 4 – Dependency Injection setup
I register my services with the Dependency Injection (DI) container in Startup.cs. Here, I also set up SendGrid and FluentEmail
Step 5 – Endpoint and Handler method
I create an HttpPost method using Stripe’s recommended code snippet. This endpoint is your Webhook. Yes, Stripe’s code has it almost taken care of. I simply tweak it to point to a custom method that is called to compose and send the email.
Task 6: Testing and deployment
Stripe provides an easy way to test your webhook as documented here. To deploy, simply take your updated site live then provide the URL to the service. It’s that simple!
Conclusion
How might this be useful to you? Most online services support Webhooks, thus allowing you to automate certain processes that you would normally do manually. For example, Google Forms support Webhooks such that one could have an email automatically sent out every time a person completes a form. Give it a go or if you’d like a helping hand, feel free to contact me.
References