
In this piece, I share how I use Azure Functions to automate the process of generating and sending daily reports, thereby saving me some much needed family time. A mock of the project can be found in my Github repo.
Daddy role involves constantly auditing my work processes to scoop up whatever time I can from redundant tasks thus affording me more time to spend with my family.
My current dilemma is with the Genii Games App which I still support whenever I can. I’ve been having a hard time keeping up with the routine of tracking daily sign-ups, sending monthly reports to contributors to the app etc. Hence, my problem statement:
Wouldn’t it be a great time-saver if I could automate the task of curating and sending me and other contributors customer reports on a regular basis?
Enter Azure Functions
Azure Functions is a host of services running on Microsoft’s server which applications can run on to provide automated tasks, storage etc. Often called serverless computing, it’s not explicitly so; there’s still a server running in the Clouds. Only this time, the server infrastructure is handled by Microsoft.
Solution
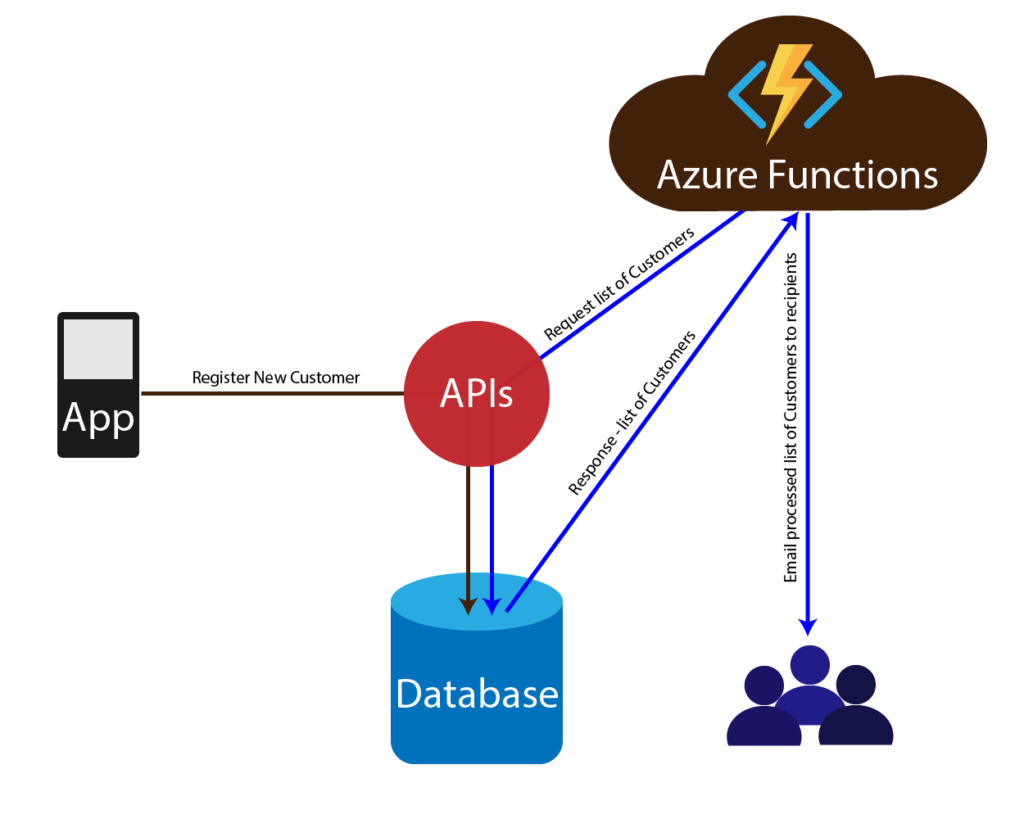
In my case, my backend for the Genii Games app already has secure Api endpoints for registering and getting a list of customers among others. What I’ve decided to do is develop an isolated Azure functions app to query the endpoint, get a list of customers, filter them by dates registered for the most recent customers, generate a CSV file then email it as an attachment to recipients.
How?
In summary, I’ll be walking you through a simple Azure Functions project that runs daily. The Azure function will handle 3 main tasks separated into services as follows:
- Call an Api endpoint to get a list of customers from a database
- Generate a CSV file containing the customer data from (1) above
- Email the CSV file as an attachment to myself and a few other recipients
Step 1: Create an Azure functions Project in Visual Studio
Launch Visual Studio >> Select Create a new project >> Select Azure Functions from the list of templates. Make sure it’s the C# version though Azure functions also support JavaScript and other languages. Name your project. In this case, mine is BabaFunkeReportManager.
Select Create and a list of event-related Azure Functions pop up. For this, since I want a function that automates the sending of reports daily, TimerTrigger is my preferred option. As the description rightly states, a Timer-Trigger is a C# function that will be run on a specified schedule.
On the left, select Storage Emulator from the dropdown list of Storage Account (AzureWebStorage). For schedule, leave it as it is which is 5 minutes. We’ll adjust the value later.
Hit Create and an Azure functions project is scaffolded for you. We’ll come back to this Function later.
Step 2: Create the Model Class
For this, since I’m returning a list of Customers and I know the model from the Genii Games App backend project, I simply replicate it here. Create a Class for Customer and add the properties. In my case, these are Id, Email, Name and Date Registered.
Step 3: Create the Interfaces
To adhere to the Single Responsibility Principle, I’d like 3 services each catering to the task of getting the list of customers, generating a CSV file and sending out an email. Hence, I have the following: ICustomerService, IFileService, IEmailService.
I like to use Generic types so we can plug in any model of choice. For example, Product, Item, Orders…instead of Customer.
Step 4: Create the Services Classes
The implementing classes for the interfaces are created as follows.
CustomerService – This generates the list of customers from an Api endpoint. I have included a URL to a demo Api project that’s included in the GitRepo for testing purposes. There are a couple of NuGet packages required for this service, notably, Microsoft.Extensions.Http (Ensure you’re using version 3.1 as at the time of publishing this, 5.0 is not supported by Azure Functions).
I also use constructor dependency injection for the IHttpClientFactory. We’ll register this in the Startup.cs later.
FileService – This generates a csv file containing the list of customers returned from the CustomerService. First, install the NuGet CsvHelper. What this class does is implement the GenerateCsvFile(List<Customer> customers) method which generates a CSV stream in memory from the customers list returned above then returns the stream. Also, I’ll be manually disposing of my stream later after sending the email.
EmailService – This handles sending out the email.
Here, we use 2 NuGet packages, FluentEmail.SendGrid and SendGrid. The former has different NuGets for different Email service like MailGun, SMTP etc. Since I use SendGrid for my email sending services, I went for the FluentEmail.SendGrid option. You may be able to use services like Gmail though it’s not recommended.
SendGrid is quite popular and a free account can get you as much as 100 emails per day. I’ve been using them for sometime now and can attest to their reliability. I don’t send a lot of emails so a free service serves me. You’ll need to register with them and obtain your API keys following the instruction in their developer docs.
To effectively implement the method SendEmail(List<Customer> customers), we’ll need to add some setups to the Startup.cs file. You may want to skip to Step 5 below then come back to the lines that follow here.
With that done, you can use Constructor Injection for your IFluentEmail service. I set up my list of email recipients as well as the attachment using the CSV stream generated from the FileService class.
Step 5: Add a Startup.cs Class
Since we’re making this a self-contained project, I’d like to use Dependency Injection (DI) to register my services. To do that, create a new class and name it Startup.cs. Make it public and inherit from the FunctionsStartup class. The latter requires the installation of a NuGet package, Microsoft. Azure. Functions. Extensions. Override the inherited method Configure. Now, we can register different services to the DI container as below.
To register the FluentEmail service, make sure you’re using your own Email and ApiKey from SendGrid.
Step 6 – Functions Class
Returning to the Azure function class that was scaffolded in Step 1 above, we can now implement the TimerTrigger with ease as follows.
Change the name of the scaffolded function class from ‘Function1’ to something meaningful; in my case, ‘ReportManagerJob’. Remember to also rename the FunctionName attribute decorator on the Run method to the new name; in my case, ReportManagerJob.
As a recap, a Timer-Trigger is similar to a Cron job which is a popular approach for scheduling and automating tasks on a server.
Next, let’s make some important adjustments to the code
- Decorate the Azure functions namespace with the attribute [assembly:FunctionsStartup(typeof(GGAppManager.Startup))] so that the Startup.cs class is recognized thus paving the way to use Dependency Injection. Add the namespace using Microsoft.Azure.Functions.Extensions.DependencyInjection.
- Make the class non-static and change the method to non-static
- Make the Run method asynchronous since we’ll be making calls to asynchronous methods in our services.
- Define instances of the Customer and Email service
- Add a constructor for the class and using Constructor Injection, instantiate the required services for Customer and Email
Note the value in [TimerTrigger(“0 */5 * * * *”)]. This is where the schedule is defined. As it is, it runs every five minutes. I usually set it to run every 1 minute for testing purposes, hence [TimerTrigger(“0 */1 * * * *”)]. Once satisfied it’s working then adjust to the schedule required. The TimerTrigger uses what’s called NCRONTAB expression to define the schedule. Each item represented by a digit or * represents the following => {second} {minute} {hour} {day} {month} {day-of-week}. See examples below.
| NCRONTAB Expression | Meaning |
|---|---|
| 0 */1 * * * * | Runs every 1 minute |
| 0 0 /6 * * * | Runs every 6 hours |
| 0 0 5 * * * | Runs at 5 AM everyday |
Step 7: Testing
Run the Azure function and it should log information if no errors though you may encounter one if it can’t find your Api endoint. For this, I have added a separate Web Api project BabaFunkeCustomer.Web in the Git Repository. This includes a mocked list of customers and most importantly, an Api endpoint to test with.
Clone the project and open it in Visual Studio. To run:
- Make the BabaFunkeCustomer.Web Api project the Start project (Right-click the project and select ‘Set as Startup project’) and run it.
- Then right click on the function app, select debug and select, Start new instance.
Step 8: Deploying to Azure
Deployment to Azure is not covered in this piece but it’s pretty straightforward using this reference provided by Microsoft. Scroll down to the part titled ‘Publish to Azure’ for a step by step process using Visual Studio. My approach is slightly different in that I manually set up a resource group, Azure storage account on Azure Portal then create a release pipeline via Azure Devops to automate the deployment once my private repo is committed.
Conclusion
How might this be useful to you? Like me, you may have a need to keep track of inventories on your website or even a database without having to manually login, write queries to view and export reports. With Azure Functions, you could have the process automated. If you’d like to discuss your specific need and how this might be useful, feel free to contact me.
References